Overview
The cybersecurity field is so vast and is ever evolving that staying current is a struggle. This struggle applies to both red teamers and defenders alike. In today’s day and age, there are plenty of platforms that provide virtual environments that allow users to test and develop their skills. But what happens when these platforms do not have a virtual environment that fits a very specific use case or scenario? Say, for example, a new vulnerability drops. If you are a red teamer, you may want to develop an exploit that would provide remote code execution. If you are a defender, you may want to test security measures to help thwart attacks from malicious cyber actors. Both parties would benefit from knowing what IOCs are left behind when the vulnerability is exploited. That knowledge would allow an attacker to clean up their tracks while allowing the defender something to hunt for in their environment.
This is where a home lab comes into play. In a manner of minutes, a few VMs could be deployed and testing started. The environment can be customized exactly as you see fit with specific operating systems, security products, or configurations in place. For these bigger platforms it could take them days or even weeks for them to develop content for the public. Even then, it may not replicate the exact environment you are interested to test in. Additionally, configuring the actual devices and services yourself will teach you the intricacies of the systems and how they interconnect with other systems in an environment. Knowing this will allow you to better protect a network, or exploit it.
Where to Begin?
There are plenty of resources out there that can help with setting up a lab environment. Around the time I decided to create my own lab environment I came across the following YouTube channel – https://www.youtube.com/@gerardobrien. The overall network design and accompanying configurations stemmed from his guide. The guide was used as a template and I deviated as I saw fit. That is the beauty of creating a cybersecurity lab, it is bespoke. But I wanted to give credit when credit is due. Definitely check out his videos for more information. This series of posts will cover my cybersecurity home lab journey. Plenty of mistakes were made along the way but I found that is the best way to learn – dive into the deep end and figure it!
Design Overview
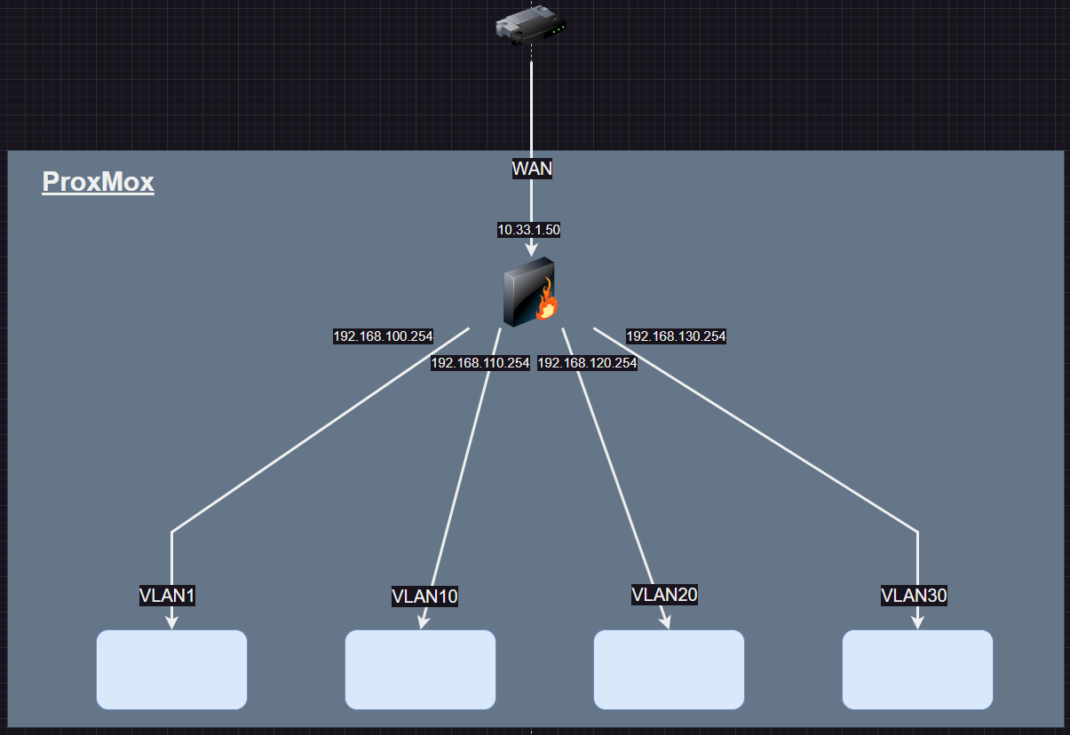
From the start, I wanted the lab to be publicly accessible. At a later time I will delve into how I decided to implemented remote access. But for now, I will go over my initial design for the lab environment. Everything was deployed on my ProxMox server. pfSense was used as my router/firewall for the lab environment. Multiple VLANS were created to segment the network. VLAN1 was reserved for Kali Linux and similar tooling. VLAN10 was reserved for *nix targets. VLAN20 was reserved for Windows targets. VLAN30 was reserved for community-created vulnerable applications. The network design is fairly simple and straightforward. I will delve into more detail in separate posts for each segment of the network.
